12.18.2010

Christmas Traditions

Our little family is still pretty new(just over three years), so we have a lot of opportunities to create our own holiday traditions.  Since our kids are also very young, we haven't done a lot of kid-friendly stuff in the past.  This year I got the Little People nativity set to keep little hands off the ornaments and other nativity sets.
 So far, it's been a big hit.  The angel sits on top of a button that plays "Away in a Manger" and lights the star up.  My daughter likes to switch the people up, and I have found the sheep on top of the stable more than once.  My grandma got us a fancy nativity set this year.  I keep it on top of the piano to keep it safe.
Christmas traditions that we already have are:
  1. Every year, we get a new Christmas storybook.  Last year we got Merry Christmas, Curious George, and this year we got How the Grinch Stole Christmas. 
  2. On Christmas Eve, we go to my in-laws' house for dinner, presents, and a Christmas program with songs and the Christmas story.
  3. On Christmas morning, we open our presents as a family, then we head to my parents' house for another gift exchange and lunch.
  4. The kids get new pajamas to wear to bed on Christmas Eve.  We got matching snowman jammies from a friend this year.  I am considering adding me and my husband to the pajama party next year.
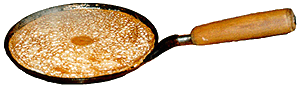
  5. We make Icelandic pancakes(like crepes, but thinner) either for Christmas Eve or Christmas.  We fill them with cinnamon sugar, whipped cream and fruit, and nutella.  This is a carry-over tradition from my family, since my dad spent two years in Iceland as a young man.  Last year, we got our own Icelandic pancake pan for Christmas from my parents.  We are thinking of making these for my husband's family on Christmas Eve this year.
As our kids get older, I look forward to starting new traditions with them.  Some things I would like to do with them are:
  • Make and decorate Christmas sugar cookies.  (This already happens almost every year anyway.)
  • Make Christmas treats to give to our neighbors.  (This also happens almost every year).
  • Go to Temple Square or Willard Bay to see the Christmas lights.
  • Do some act of service for someone in our neighborhood.
  • Light Christmas candles on Christmas Eve and watch them burn down until bedtime.
  • Do a Christmas advent calendar.
I'm sure there are other things that I will be adding to the list over the years.  I look forward to when our kids get excited for holidays and can help me create our own family traditions.

12.13.2010

Winter Wreath Chandelier

I mentioned wanting to do this project a few weeks ago, if anyone remembers, but I wasn't quite sure how it would turn out.  I think I'll call this one a success.  It's not huge, but it looks really great in my dining area.

 All I had to do was unwrap the ribbon and garland from my fall wreath and I had a great base for my faux chandelier.
 I grabbed the snowflake ornaments, silver tinsel garland, and glittery ribbon in the holiday section of Walmart.  All I had to do was wrap the tinsel, tie the snowflakes on, and string it up by the ribbon.  I installed a hook above the dining area (all by myself; go me!) and hung it above the table.

The best part is that I can still reuse the wreath again if I want to take it all apart.  I was also able to use the rest of the tinsel garland for the tree, so now we have a nice silver glitter theme going on.

I'd like to start some fun holiday traditions for our family, so I'll be showcasing some we already have and some I'd like to start.  Leave a comment or email me if you have any fun traditions you'd like to share.
 

12.08.2010

Pennant Banner

The nursery wall decor is finally complete!  I made the pennant banner with our baby's name a couple of weeks ago, and I just barely got around to hanging it today.  I also hung four 8"x10" photos that we took and had printed.  You can see a couple of them in the photo above and in the last photo. 
For the pennants, I used fabric remnants from her quilt and car seat canopy.  Each piece was ironed onto fusible interfacing for sturdiness, both visual and physical.  I used heat-transfer vinyl with flocking for the letters.  It was my first experience using it, and it was super easy to cut the letters on my Silhouette and iron them onto the fabric.  The edges were trimmed with pinking shears, then all the pieces were sewn onto a long piece of brown satin ribbon.  I really love how it turned out, and it fills in that wall very nicely.
My mom found some flowers for the awesome yellow vase that I got at IKEA.  I finally feel like the little details are finished!

I've finished and hung a winter wreath chandelier above our dining area that I'll be sharing later in the week.


Linked up:
Visit thecsiproject.com

11.19.2010

She's Here!

My daughter Amelia was born on Sunday!  We are adjusting well to having her home, and I think I will be wanting to start some holiday projects pretty soon.  I am also excited to start on the pennant banner of her name for above her crib in the nursery.

I am starting to get really excited for the Christmas season!  I saw this project on Studio 5 today about decorating with branches, and I'm starting to feel the spirit of the holidays.  I'll have to be on the lookout for some great branches to glitz up.

My husband surprised me with an early birthday present last week: a new laptop!

Wahoo!  Now I can blog while my husband does his homework.  I haven't put my project to-do list up lately, and I've finished some more things, so here's the current list:

Make fabric boxes for the new changing table
•Finish fall wreath
•Paint birdcage cream or light yellow
•Find a buffet to paint for the dining area
•Get chairs for the front porch
•Get potted plants for the driveway
•Build shelves on either side of the washer and dryer
•Take door off coat closet, paint, and put cubbies inside
New couch pillows
•Install wall shelf in main bathroom
•Refinish piano
•Make some green frames to match green stained table
•Fix leg on green table
•Get or build a picnic table for the backyard
Sew kitchen curtain
•Sew changing pad covers
•Make flower hairclips
•Turn craft room into nursery
•Laundry room makeover

11.11.2010

Homemade Apple Pie

I learned how to make homemade pie this week at one of my mom's ward's Relief Society activities.  This was my first pie from scratch, and I was pleasantly surprised at how (relatively) easy it was!  Here's the recipe we used for the crust:

Pie Crust
2 c. flour
1/2 tsp. salt
2/3 c. Butter-flavored Crisco
1/4 c. cold water

First, combine the flour and salt.  Then, cut in the shortening with either your hands or a pastry blender.  I found that using my hands was much faster and easier.  Once all the flour is mixed in and the shortening is in tiny balls, slowly add the water and stir in with a fork.  Don't mix it too much or the crust will get chewy.  Divide the dough evenly into two balls. 

The crust is ready to roll out!  Try to keep the edges from splitting too much by continually pressing the cracks back together.  Put the rolled out crust into the bottom of your pie pan.  Be very gentle and make sure not to stretch the crust out.  Trim the edges by running a knife around the edge of the pie pan.  Now you are ready for the filling!

The filling was also easier than I expected.  Here's what you need:

Apple Pie Filling
Cored, sliced, and peeled apples (We used tart apples)
Cinnamon
Flour
Sugar

The whole thing was pretty inexact.  We just filled the bottom pie crust with apples and sprinkled a bit of each of the other ingredients on top.  You don't need a ton of cinnamon, flour, or sugar.  Make sure you put more apples than you think in, because they will shrink when you bake the pie.

Now, roll out the other dough ball for the top crust.  Lay it over the top, trim the edges, pinch the edges together, and cut some vent holes into the top.  You can get creative with this bit.  I did a star pattern.  You can also use the extra pieces of crust to make little shapes for the top.  My mom did a berry and leaf pattern.

For the final touch, brush the top of the pie with milk and sprinkle raw cane sugar all over.  Bake at 375 degrees for about 45 minutes, or until you can see the filling bubbling and the crust is brown.
We ate ours with some vanilla bean ice cream, and it was really tasty!


11.01.2010

Pumpkin Carving

We did some pumpkin carving on Saturday.  It was a nice diversion from being extremely pregnant.  My husband did the mummy from a pattern, and I did the "welcome" and Jack Skellington ones freehand.  Here's how they looked all lit up:
We have three leftover pumpkins that we are going to carve for Thanksgiving, just for the fun of it.  We had a blast trick-or-treating and partying over the weekend.

Hope you had a great Halloween!

10.25.2010

Birdcage Redo

Last week, I had my first experience with using a glaze.  I have been wanting to brighten up my black birdcage for a while.  After I started, I realized that I chose a really intricate piece for my first try, but it all worked out in the end.

Since the birdcage was already the color that I wanted to show through beneath the crackle, I didn't have to do any painting before the glaze.
This is the before photo.  I cleaned up all the dust before I started.  I got the Weathered Crackle Glaze from Lowe's and a quart of cream-colored paint with a flat finish.  

*Note: It is very important to get paint with a flat finish, otherwise the topcoat paint won't crack.  I also tried using flat spray paint, but that doesn't work either.

The first thing I did after cleaning the birdcage was to paint a coat of glaze over the entire cage, starting with the inside.  Next, I waited for the glaze to dry for one hour.  Now I had a three-hour window in which to do the cream-colored paint.  After four hours, the glaze doesn't do the crackle effect anymore.
The topcoat was the most time-consuming part of the project.  The paint needs to be applied in as little strokes as possible to prevent the glaze from coming up and gumming in with the paint.  I tried get as much coverage with one stroke as I could.  It turned out pretty well overall.  There were some spots where I had a little bit of trouble, but I am very pleased with the results, especially for my first crackle project.

Luckily, I have a lot of glaze and paint left over, so I will be able to do many more projects like this.  I would recommend anything with lots of flat surfaces for a first project, like a message board or picture frame.


Personalized Baby or Toddler Shirt

I finished an order last week for a Personalized Baby/Toddler Shirt.  I haven't done one in this font before, and I thought it turned out really cute and fun!

I'm planning on getting some heat-transfer vinyl and doing some experimenting with my Silhouette.  I'll post pictures all about it. 

10.19.2010

New Messenger Bag


This version features three different colors of embroidery floss: red, orange, and yellow.  The branches were printed onto olive fabric.  This is the last bag with the olive color.

I still have two more bags to make, both of which will be on brown fabric, then I am officially out of the cherry branches.

These bags have always been popular in the past, so it may not be around for long!

10.18.2010

Changing Pad Covers

When we got our changing table, the pad that came with it was boring, white, and plastic-y.  Waterproof, yes; but stylish, no.  I had some baby print flannel on hand, so I thought I would see what I could do with that.

Luckily, I had just enough to fit the changing pad perfectly.  It was seriously meant to be.  I used a yard of flannel and four buttons to make a sort-of duvet cover for the pad.
Since I have already had a baby, I knew that I would want an extra to have on hand.  I also had a yard of this flannel in my fabric:
This is one of the last projects that I had planned for the new baby!  Now I am not quite sure what to do with myself.

10.16.2010

Car Seat Canopy

Since I spent so much time trying to balance a blanket on top of the car seat last time I had a baby, I decided to buckle down and make a canopy/tent/cover/whatever-you-want-to-call-it.  I found some white minky on sale for the inside, and I got this great Alexander Henry fabric for the outside.  Since I spent a little bit more on specialty and designer fabrics, the total cost was around $20, thanks to some great coupons.  

I used this tutorial for the basic measurements and such, but I didn't end up making it reversible, so I only have the straps on the outside.  As I was making this helping my mom make this, I thought that it would make a pretty cute blanket one day if you just unpick the straps once you are done using it with the carrier car seat.

My due date is a month from Monday, so the anticipation is really growing!  I can't wait to use all the cute stuff we have been accumulating lately. 

10.15.2010

Pennant Wall Art

We hung the pennant wall art that I made for the baby's room, and it looks fab!  
The stripes are painted, the flags are scrapbook paper, and the strings are ribbons.  The paper gives it a lot of dimension, and the ribbon adds some fun texture.  The room feels a lot more complete on that side as well.

Bathroom Shelf

Welcome to our poor, neglected main bathroom.  Of all the rooms in our house, the main bathroom, master bathroom, hallways, and laundry room are all still basically untouched decor-wise since we moved in a little over a year ago.  No paint, no theme, no nothin'.  

All we did was hang that little wall shelf over the toilet (the other jungle decor is a lucky hand-me-down from my mom), and things look a lot more lived-in already.

Here's to finishing another project that I have had on my list for a while.
  • Make fabric boxes for the new changing table (still looking for a great tutorial, will let you know when I find one!)
  • Finish fall wreath (work in progress!)
  • Paint birdcage cream or light yellow
  • Find a buffet to paint for the dining area
  • Get chairs for the front porch
  • Get potted plants for the driveway
  • Build shelves on either side of the washer and dryer
  • Take door off coat closet, paint, and put cubbies inside
  • New couch pillows
  • Install wall shelf in main bathroom
  • Refinish piano
  • Make some green frames to match green stained table
  • Fix leg on green table
  • Get or build a picnic table for the backyard
  • Sew kitchen curtain (work in progress!)
  • Sew changing pad covers
  • Make flower hairclips
  • Turn craft room into nursery
  • Laundry room makeover

10.08.2010

Chalkboard Sign Redo

I have been wanting to do a chalkboard paint project for a while, and I have also had a good-sized wooden sign that has not had a home since we moved to our new house.  Finally, the pieces came together and this project happened.  I didn't take a great before picture, but I was able to find a photo that gives you the idea:
I sanded down the part of the wood that had the writing, removed the thin wire hanger, and drilled bigger holes.  Then, I painted about three coats of apple green over the top of the black and sanded the edges a little bit.  Next, I taped off the area I wanted to be the chalkboard and painted about three coats of chalkboard paint.  After the paint was dry, I seasoned the chalkboard paint, threaded on the ribbon hanger, and wrote a festive message! 
I am very pleased with the result!  I love that I just erase the writing and have a year-round message board.