I made some of these fabric pom pom headbands in anticipation of the newest member of our family-- our third baby girl! Her big sister was slightly willing to model them for me, since we haven't met our little bundle yet. We are not hurting for girly stuff around here, but it's always fun to make something new. This project is great for using fabric scraps, and these didn't take too long using this tutorial from Little Miss Momma.
I got the fancy elastic a while ago from Pick Your Plum, and it's perfect for these headbands. After googling headband sizes, I varied all the lengths between 12" and 15" for newborn head sizes and up. Obviously some of them are big enough for a two-year-old, but I also made a couple of smaller baby sizes.
Can't wait to meet our little girl!
Showing posts with label tutorial. Show all posts
3.08.2013
1.01.2013
Curvy Pleated Pouch & New Mom Hospital Survival Kit
My sister-in-law is pregnant and due with her first baby soon, and I had her name for the gift exchange, so I thought it might be fun to do a little "Hospital Survival Kit" to go inside the pouch. It's kind of hard to tell in these first pictures, but these pouches end up as a pretty good sized clutch, so there is a bit of room in there. Having had two kids myself, I was able to think of a few little luxuries that are nice to have in the hospital. Here's what I included:
Socks, lip balm, mints, and nail polish may seem like silly things to send, but when you are sitting in a hospital room wearing an ugly gown and not quite feeling yourself, it's the little things that cheer you up and make you feel like a normal person again. Lip balm is great for when you aren't allowed to eat anything, mints for when you can't get up and brush your teeth, nail polish for if you get some downtime, and socks are the only clothes of your own you can wear all the time.
ETA: You can buy this Cabbage Rose fabric by Heather Bailey online from The Cloth Parcel!
5.04.2012
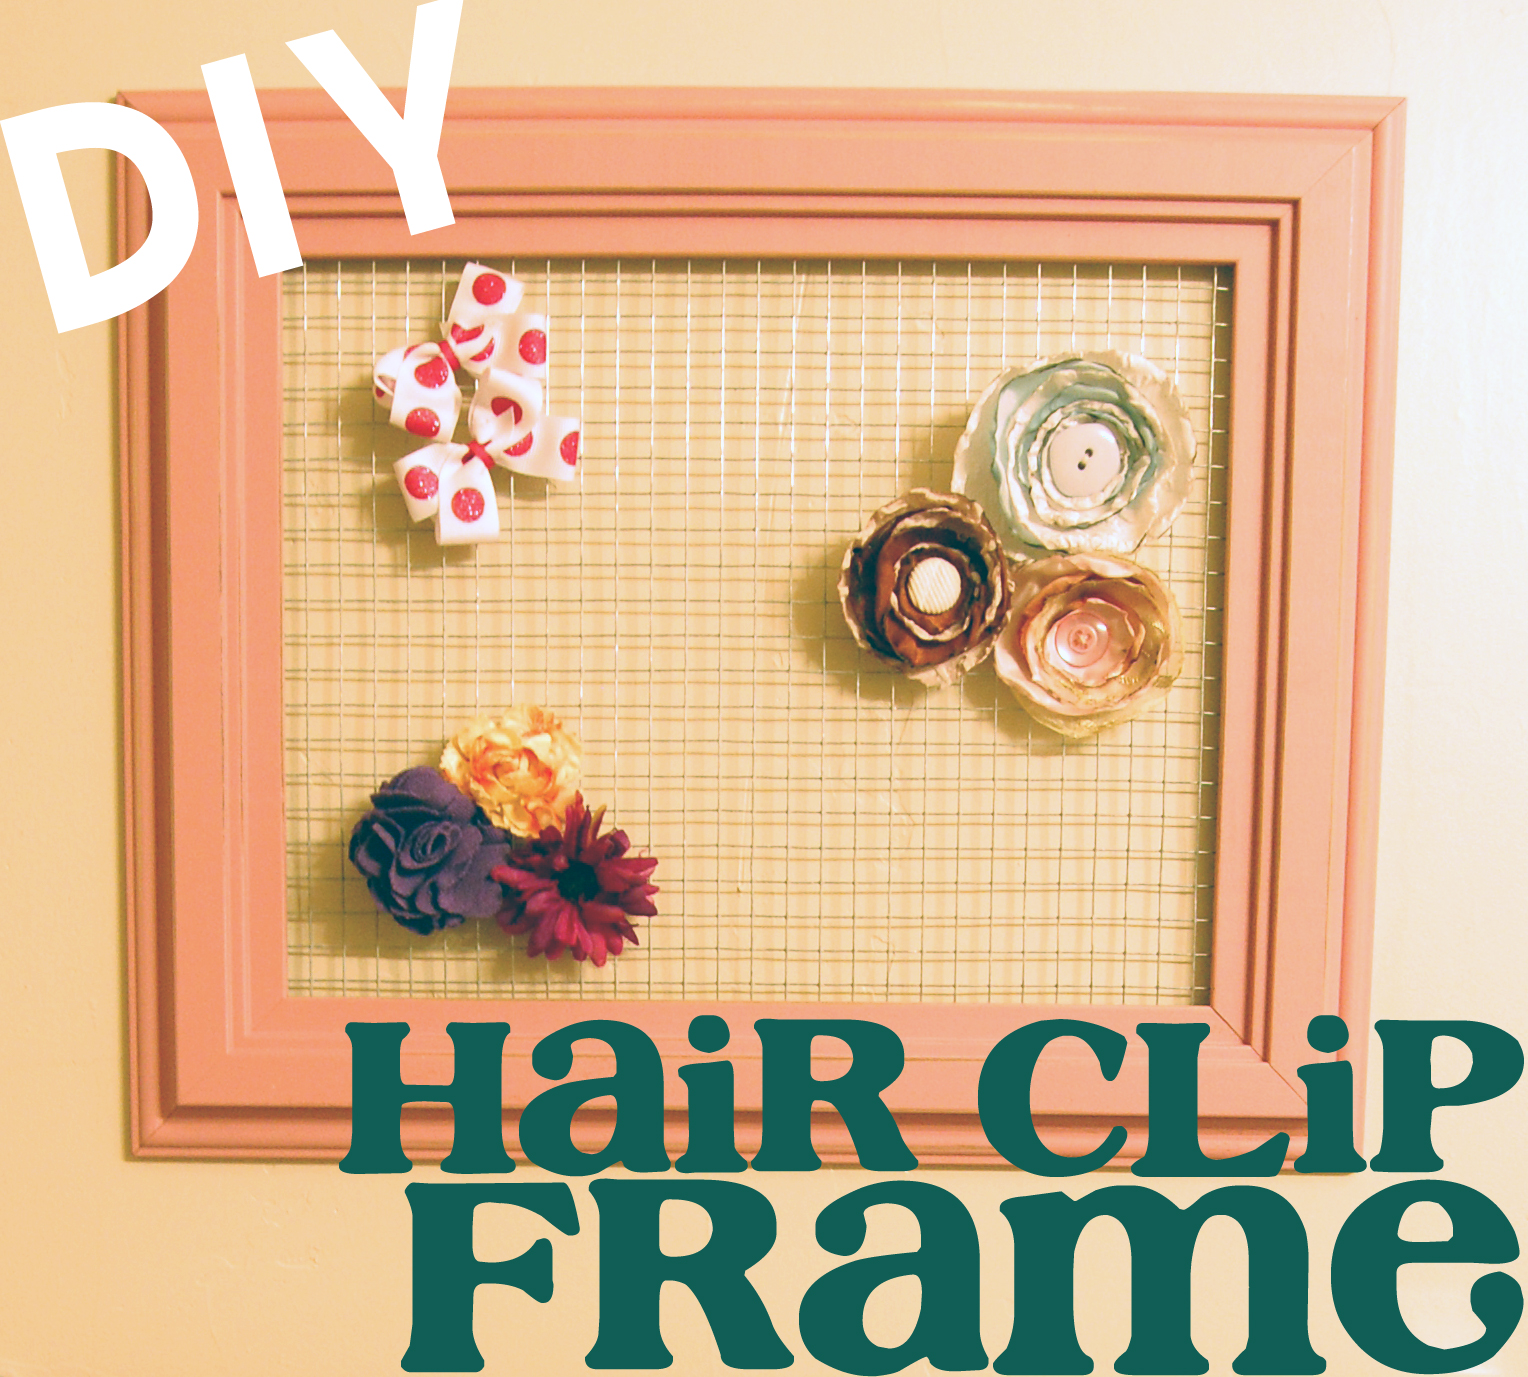
DIY Hair Clip or Earring Frame
Today, I'm going to share a simple and fun tutorial for keeping all your girly things organized. If your house is anything like mine, every little bit helps! We already have the hair clip tree in the girls' bathroom, but as our collection of bows has grown, the tree has been all filled up and we need more storage. This follows the same sort of method as my reclaimed barnwood earring holder, so if you don't need hair clip storage, you could make this for your earrings instead.
For this project, you will need four basic items:
Okay, to get started, flip your empty frame over onto your workspace so the back is facing you. Without doing any cutting yet, lay your wire mesh in the frame where the glass sits and fit two of the sides in. At this point you can either secure it with a staple, or if your frame has metal tabs to hold the back in, just bend those down over the top of the mesh, like so.
Now, grab those tin snips or wire cutters and cut the other two sides to size, making sure that the mesh stays put while you cut.
If the wire is poking your hands or otherwise bothering you, just roll it up as you go. For me, it makes it that much easier to cut.
Once all the wire is cut and fitted into your frame, get your staple gun and get to work. If you can staple your mesh into the wood without the staples coming out of the front of the frame, do that. My frame wasn't thick enough, so I used my staples in a different way.
My handheld staple gun never seems to get the staple all the way in, so I just stapled above the mesh all the way around and bent the staples down with a hammer to hold the mesh in. It seems to work just fine. Like I said, if you can figure out a way to staple your wire in better, definitely do that. Your other option is to cut the mesh bigger than your frame opening and staple it on the back of the frame. I didn't like the look of that, and because the mesh will sit against the wall when the frame is hung, I don't think you could hang anything on it.
We hung it in the kids' bathroom above the towel rack. I think it looks great, and I'm so glad to have more storage that is cute and accessible. Plus, the kids can't reach it yet, so it stays just how I left it.
All in all, I'd say you could easily do this in under an hour once you have all the supplies and tools ready. The My Memories digital scrapbooking software giveaway ends Sunday night, and the winner will be announced on Monday. Have a great weekend!
Linked: Six Sisters' Stuff, Classy Clutter, Tatertots and Jello
For this project, you will need four basic items:
- Large empty frame
- Welded wire fencing
- Staple gun
- Tin snips or wire cutters
Okay, to get started, flip your empty frame over onto your workspace so the back is facing you. Without doing any cutting yet, lay your wire mesh in the frame where the glass sits and fit two of the sides in. At this point you can either secure it with a staple, or if your frame has metal tabs to hold the back in, just bend those down over the top of the mesh, like so.
Now, grab those tin snips or wire cutters and cut the other two sides to size, making sure that the mesh stays put while you cut.
If the wire is poking your hands or otherwise bothering you, just roll it up as you go. For me, it makes it that much easier to cut.
Once all the wire is cut and fitted into your frame, get your staple gun and get to work. If you can staple your mesh into the wood without the staples coming out of the front of the frame, do that. My frame wasn't thick enough, so I used my staples in a different way.
My handheld staple gun never seems to get the staple all the way in, so I just stapled above the mesh all the way around and bent the staples down with a hammer to hold the mesh in. It seems to work just fine. Like I said, if you can figure out a way to staple your wire in better, definitely do that. Your other option is to cut the mesh bigger than your frame opening and staple it on the back of the frame. I didn't like the look of that, and because the mesh will sit against the wall when the frame is hung, I don't think you could hang anything on it.
We hung it in the kids' bathroom above the towel rack. I think it looks great, and I'm so glad to have more storage that is cute and accessible. Plus, the kids can't reach it yet, so it stays just how I left it.
All in all, I'd say you could easily do this in under an hour once you have all the supplies and tools ready. The My Memories digital scrapbooking software giveaway ends Sunday night, and the winner will be announced on Monday. Have a great weekend!
Linked: Six Sisters' Stuff, Classy Clutter, Tatertots and Jello
3.08.2012
Zippered Pillow Cover Tutorial
Pin It
As I mentioned last week, I have just discovered how to make a zippered pillow cover. From one sewing beginner to another, here's how I did it.
Supplies Needed:
-Pillow form (Mine is 12"x24")
-Two fabric rectangles (Mine are 11"x23")
-Zipper (that is 2"-4" shorter than the side you are putting the zipper on)
-Sewing machine and notions
(*A note on the fabric and pillow form dimensions: I usually use down pillow forms, and the finished size of the pillow cover is two inches smaller than the form. This makes for a nicely-filled pillow, and is mostly important for down inserts. However, the form I had for this project was very tightly stuffed, and if I were doing this pillow again, I would make the finished size of the cover the same size as the form, which would mean that my fabric size would be 13"x25" rather than 11"x23". It was almost impossible to get the form in the cover!)
9- Turn the foot and go back down on the other side, doing the zipper slide trick (steps 3-6) again on the way back.
Beautiful! You can relax now, because the hard part is over. Make sure that you leave the zipper partially opened, so you can turn it inside-out when the time comes. If your zipper cloth extends far enough to the edges of the pillow to interfere with your side seams, just trim the tails off to reduce bulk in the corners.
Pin the rest of the pillow together with right sides facing.
Sew all the way around the remaining sides with a 1/2" seam allowance.
Clip your corners, and turn it inside-out.
Good thing you left that zipper open!! Get everything all turned out, then iron the seams.
Now grab that pillow form, stuff it in, zip it up, and you are good to go!
I love it! Being able to sew your own pillow covers really opens up the possibilities for personalizing and changing up your home decor. It's also probably the easiest way to introduce a new color or pattern to a room, and now that you know how it will be a breeze. As always, any questions leave me a comment or send an email.
Linked up:
As I mentioned last week, I have just discovered how to make a zippered pillow cover. From one sewing beginner to another, here's how I did it.
Supplies Needed:
-Pillow form (Mine is 12"x24")
-Two fabric rectangles (Mine are 11"x23")
-Zipper (that is 2"-4" shorter than the side you are putting the zipper on)
-Sewing machine and notions
(*A note on the fabric and pillow form dimensions: I usually use down pillow forms, and the finished size of the pillow cover is two inches smaller than the form. This makes for a nicely-filled pillow, and is mostly important for down inserts. However, the form I had for this project was very tightly stuffed, and if I were doing this pillow again, I would make the finished size of the cover the same size as the form, which would mean that my fabric size would be 13"x25" rather than 11"x23". It was almost impossible to get the form in the cover!)
First, pin fabric rectangles together with right sides facing, and pin the edge where you'd like the zipper to be located. Next, you'll be sewing the edges of the side together and leaving an opening for the zipper. To find out how far you need to stitch in on each end, measure your zipper and subtract that number from your side length, then split the resulting number in two to figure out how far in you need to stitch. Example: I had a 9" zipper and and 11" side. 11-9=2, 2/2=1, so I stitched one inch in on each end with a 1/2" seam allowance:
Now, open the seam and iron it flat all the way down.
This next step is probably optional, but I like the finished look it gives the seam, and I think it probably strengthens the opening. Sew all the way around the ironed seam close to the edge.
Now you are ready to set the zipper. With the 1/2" seam allowance, the zipper should fit right over the seam. Pin it in place with the zipper half open.
Now, you are going to have to semi-ignore my next photos. Apparently, you are supposed to stitch on the inside of the metal tabs on the ends of the zipper. I claim that I don't really know what I am doing.
Basically, you are just sewing a rectangle around the zipper. Here is the breakdown:
1- Sew across the end of the zipper (on the inside of the metal tabs), making sure to backstitch.
2- Start sewing along the side of the zipper. Use a zipper foot if you have one. I don't, so I just move my needle all the way to the left and get as close as I can. It seems to work.
3- Stop when you get to the zipper and set the needle.
4- Lift the presser foot.
5- Slide the zipper past the presser foot.
6- Put the foot back down and carry on.
7- Stop when you get to the other end, and turn the foot.
8- Sew across the other end of the zipper (on the inside of the metal tabs).9- Turn the foot and go back down on the other side, doing the zipper slide trick (steps 3-6) again on the way back.
Beautiful! You can relax now, because the hard part is over. Make sure that you leave the zipper partially opened, so you can turn it inside-out when the time comes. If your zipper cloth extends far enough to the edges of the pillow to interfere with your side seams, just trim the tails off to reduce bulk in the corners.
Pin the rest of the pillow together with right sides facing.
Sew all the way around the remaining sides with a 1/2" seam allowance.
Clip your corners, and turn it inside-out.
Good thing you left that zipper open!! Get everything all turned out, then iron the seams.
Now grab that pillow form, stuff it in, zip it up, and you are good to go!
Linked up:
2.01.2012
Felt Flower Grapevine Wreath
Here it is again! It's about time I busted this thing out. This go-round, I was going for a more season-neutral theme, to a point. I didn't want something that I would necessarily have to take down because a certain season just ended, but I also don't plan to leave it up all year.
While I was making these felt flowers, I thought that some of them would make really cute hair clips for my girls. So, in the spirit of interchangeable wreath, I just put each flower on its own clip, so now I can rearrange the flowers and use them as hair clips when we're ready to switch things out again. I can also switch out the color scheme very easily.
Another thing that I added to the wreath that you can't see in the photo is a felt lining on the back. This is the only wreath I have that scratches my front door's paint, so I cut one-inch strips of black felt and hot glued them all the way around the wreath on the back, so they created a big circle. It's great, because now I don't wince every time someone opens the door!
I was pleasantly surprised at the easiness of this project. Seriously, felt is so forgiving, and I was able to do all of these in one day. I recommend using wool felt. It is much thicker, looks higher-end, and comes in so many cool colors. I found mine at a quilt shop. All I needed was about four sheets of felt, a glue gun, and some hair clips to make these (all of which I had on-hand). These flowers would make great accents to girls' headbands or even as a gift bow.
Linked up: Tatertots & Jello
1.20.2012
Ironing Board Cover Tutorial
So, you want to see how I did it? Spoiler: there's not much to it. All you will need is about a yard of fabric, and batting if you need new cushioning.
Let's get going! Remove that nasty old thing and take the string out of the casing. Also, remove your padding if you want to replace that, too. Save all of these pieces. As you have probably guessed, you'll be using these pieces as your patterns. Lay your padding piece out on top of the batting and cut it out. I use the term "padding" loosely, because in my case it was more like foam tissue paper.
Since I have been under-cushioned for so long, I doubled up the batting for extra plushness.
If your fabric isn't as long as your ironing board, you will need to do a little bit of piecing. I actually ended up having to piece twice, since my fabric was just under a yard. Cut your fabric in half lengthwise, then straight stitch along the shortest side to get one long piece of fabric.
Since your ironing board is out of commission, just grab some bath towels to iron on for a little bit. Press your seam open to reduce bulkiness.
Now you are ready to cut out the pattern. Pin the old cover down in a few places and draw around it, leaving about an inch for seam allowances for the string casing.
I just grabbed a sharpie and traced around it.
After it is cut out, fold the edges down and iron a 1/4" seam all the way around. Fold it over again, this time 1/2", and iron again or just pin. Leave a one inch opening to put the string in. You will have to do some trickery around the curves, pleating here and there and pinning in place. It doesn't really matter how it looks, because you won't be able to see it.
Starting at the back end, sew all the way around with a 1/8" seam, making sure to leave that one inch gap I talked about earlier.
Once you are done, you can iron the casing down, but it will just get messed up again on the next step, so I'd skip it. Tie your string to a safety pin and thread it through, all the way around to the other side. This part was the worst. My hands started cramping so bad!
Once your string is through, sandwich everything back together, cinch it up and tie it off. You are ready to iron in style!
Once I paint my laundry room purple, this will match perfectly!
Linking up: Tatertots and Jello
Labels:
cover,
ironing board,
laundry room,
sewing,
tutorial
Subscribe to:
Posts (Atom)