1.30.2013

Peacock Blue Yarn Wreath

I tried my hand at a wrapped yarn wreath the other day to try to keep myself occupied during some pretty awful weather.  If you are looking to fill some time, a yarn wrapped wreath is the way to go.  Looking for a quick project?  This is not it.  It got a little tedious, but I do like how everything turned out.  I used a straw wreath form and kept the plastic wrapper on it.  That kept it from making a huge mess and made the yarn lay flatter.
For underneath the flower embellishments, I glued down a piece of crocheted lace.  Then I did a few rolled flowers, two out of felt, one out of burlap, and one out of a piece of cotton trim I had on hand.  The yellow flowers are just a rolled up strip of felt that I cut into a fringe.  I just love how everything turned out!
 

1.24.2013

Zig Zag Quilt

If you never thought you'd see the day that I finally finished my zig zag quilt, you would not be alone.  But, great things have been known to happen around here from time to time, so as a small attempt at a New Year's resolution, I finished this thing.
I used two flannels for the back in wide horizontal stripes, and I love how it turned out.  Admittedly, this is the first quilt I have made where I did every step myself, including the quilting.  I used a free motion foot for my Bernina.  Talk about an upper body workout!  It's not perfect, but I still love it.
The basement family room that I made the zig zag quilt for is almost done, too.  Right now, we are finishing installing rock around our fireplace.  After that, we just have to do trim before the carpet can be installed.  Happy day!

I used this quilt tutorial from the Bee Square Blog.  It was fairly simple and easy to follow.  Go make your own!

1.22.2013

The Cloth Parcel

I've mentioned that I have been working on a fun new business with my mom, and it's finally up and running!  The Cloth Parcel is our new quilting and crafting website.  We have cute fabric, original patterns, craft and quilting kits, and so many fun notions.  All of the patterns were written by my mom or me, or both of us together, and are available to download right when you buy them.
I designed this Chenille Burp Cloth Kit, which features Riley Blake Woodland Tails flannel, in both pink and blue.  These make stunning baby shower gifts, and since they are much smaller than a blanket, it's not a huge ordeal to make the chenille.  We even have Olfa Chenille Cutters available, which make this project so quick and easy.
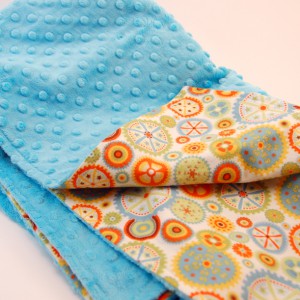
We have put together nine different baby blanket kits, also available in burp cloth size, which come with super soft Shannon Cuddle fabric for one side (also known as minky) and a variety of flannels for the backs.  The flannels come from Moda and Riley Blake.
How cute is this little wind-up bear?  We scored these Japanese Tokotoko Wind-Up Felt Doll Kits after we saw them at Quilt Market last October.  The kits come with everything you need for the dolls, including the wobbly wind-up mechanism.  We have seven different dolls: Red Bear, Orange Cat, Pink Rabbit, Alice in Wonderland, Snow White, Pinocchio, and Red Riding Hood.  You have to see all of them!

We have so many fun things that are still in the design stages, so keep checking back.  I will still be putting my own projects up on here, so don't think I'm going anywhere.  Today is my day to finish the binding on my zig zag quilt (it's about time)!  Also, don't forget that the Lifestyle 50% off promo is running this whole week.

1.18.2013

Lifestyle Crafts: 50% Off Promo Code!

Lifestyle Crafts is running a HUGE special next week.  You know my coupon code "AUDZIPAN" that usually gets you 20% off?  Well, from January 21-27, that same code will get you a huge 50% off on anything at Lifestyle Crafts!  I don't know about you, but I love a great deal.  If you are in the market for some new dies, embossing folders, or letterpress supplies, don't pass this one up.

1.01.2013

Curvy Pleated Pouch & New Mom Hospital Survival Kit

I discovered this curvy pleated pouch tutorial on Pinterest from Charm Stitch months ago, but I only thought to make some a couple of weeks ago for Christmas gifts.  I made two, and they both turned out super cute, although I didn't get any photos of the second one.  I would have made another one for myself, but I ran out of zippers (and time).  I loved that I was able to use some of my cute fabric scraps for these, too.
My sister-in-law is pregnant and due with her first baby soon, and I had her name for the gift exchange, so I thought it might be fun to do a little "Hospital Survival Kit" to go inside the pouch.  It's kind of hard to tell in these first pictures, but these pouches end up as a pretty good sized clutch, so there is a bit of room in there.  Having had two kids myself, I was able to think of a few little luxuries that are nice to have in the hospital.  Here's what I included:
Socks, lip balm, mints, and nail polish may seem like silly things to send, but when you are sitting in a hospital room wearing an ugly gown and not quite feeling yourself, it's the little things that cheer you up and make you feel like a normal person again.  Lip balm is great for when you aren't allowed to eat anything, mints for when you can't get up and brush your teeth, nail polish for if you get some downtime, and socks are the only clothes of your own you can wear all the time.
I had so much fun putting this together, that I may have to start taking these to baby showers.  Hopefully I get around to making one for myself, as I'll be wanting it come March!

ETA: You can buy this Cabbage Rose fabric by Heather Bailey online from The Cloth Parcel!